Why is the contract in the Proposal file under the ‘Booked’ area, but does not have a contract number? Why is the status set to Revised?
This means that the Rep created the order, clicked the handshake button, but then clicked the Recall button in Booking Express. They made changes to it, but did not click the handshake button again. You absolutely must click the handshake button again after recalling and revising so that the changes make it to Traffic and get on the air.
Why is the contract in the Proposal file under the ‘Booked’ area, and has a contract number, but the status is set to Revised?
This means that the Rep went into the contract, viewed it, and then clicked the save button. SDS will mark the order as Revised, regardless of whether a change was actually made. SDS’ suggestion is that if you need to simply look at an order, don’t hit save, and instead use the blue arrow on the campaign summary page to get out of it. To reiterate, if you do make a change to it – rate change, spot type change, add a new day part/feature and spots - you MUST click the handshake button to re-book it.
Why is the contract in the Proposal file under the ‘Booked’ area, and has a contract number, but the status says Outbox?
Even when a contract is revised and rebooked, it will go through the same process as when it’s a new order. It is sent immediately to your Outbox, and will then need to be approved by your Sales manager, and then by Traffic. Once it has been completely confirmed, the contract will come back to you, and will appear in your Inbox.
Why are there orders in the Proposal file under the ‘Proposed’ area?
This means that an order was simply entered and it was saved, but it has never been booked
Why are there orders in the Proposal file under the ‘Post’ area?
This means that an order (whether it was a proposal or a contract) was copied and the user chose to copy it into ‘Post’ instead of ‘Pending.’ Always choose Pending when copying an order! The other reason is that there have been posts done against a contract – this is the holding area for those types of contracts.
When I try to open a contract in the Proposal file, under ‘Booked’ why does it re-direct me to the Booking Express Inbox area of SDS?
The Booking Express is a holding area for all of your contracts, when it comes back from Traffic. If you open up the contract from Booking Express, it automatically moves it from this area to the Proposal file, and this is perfectly fine. If you simply want to move all of the contracts out of Booking Express into the Proposal file, simply use your Ctrl key to multi-select the contracts and click on the Move button. This will move all selected contracts without opening them (you will get a message indicating this). It is your responsibility to keep track of what you have booked, and if your Sales Manager or Traffic has approved it.
After I recalled my order, and made changes to it, the system won’t allow me to rebook it. Why not?
After you recall an order in Booking Express, and it hasn’t been accepted by the Sales manager yet, it will be immediately confirmed as recalled and you can make any changes you need. However, if the order has been accepted by the Sales manager, and it is now awaiting Traffic’s approval, you will get a message that says “A recall request has been sent to Traffic.” You MUST wait until the status of your order changes to “Recall Confirmed” before you make any changes to it. Otherwise, you will be opening up the order in “Read Only” mode and any changes made, will not actually be made and you will not be able to book it again.
If an order is rejected, and the Traffic Manager enters in a reason as to why it was rejected, where does it appear in Sales?
From Booking Express or Proposal File retrieve the order by double clicking on it. Click on the Schedule Builder icon. Go to the line where it says Rejected. Click there and the reason will pop up in a separate dialogue box – this is what the Traffic Manager has entered in Symphony (where they accept the orders)
If an order is rejected, and the sales manager/finance manager enters in a reason as to why it was rejected, where does it appear in Sales?
Click on the Booking Express icon and find the order – it will say “Booking Rejected” highlighted in red
Close to the bottom of the screen, there is an area where the comments will appear, under Explanation of Header Changed

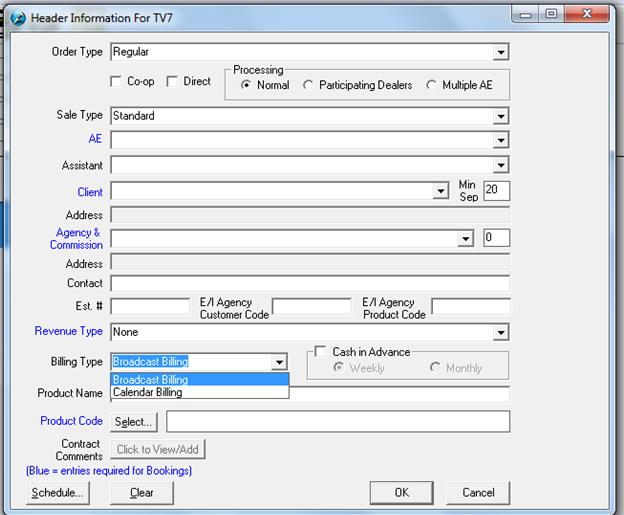
The Rejection reason will now appear in the Header Information of the order, by clicking on the “Click to View/Add” beside Contract Comments
![]()
The following screen will appear displaying the comments entered by the Sales Manager, Finance Manager or Traffic Manager

I was trying to enter orders into SDS and when I click the flight manager, I get the following message: “There is no audience sourced selected for TV7. Please set a default source for this.” What does this mean, and how do I select the source?
This means that a new rate card has either been entered into the Sales system and hasn’t been selected, or an existing rate card has been archived and is no longer accessible. To select the new source, click on Audiences&Rates within the Schedule Builder and choose Audiences from the menu,
From there, a window will appear. Choose the rate card that you wish to use from the list, and place a check mark beside it. Then, if not already selected, place a check mark beside “Set as default”

What are some of the items I can change to an order when entering it, from the default?
The Billing Type, the Agency Commission and the Time Separation can be changed. They are all accessible in the Header Information.
![]()
![]()
![]()

I’m trying to enter in a 2 year contract and a message appears saying that only 53 weeks is allowed. Is there a way to enter the full order on one contract, or does it have to be entered in as two different contracts?
In Sales, you can only enter in a maximum of 53 weeks. This is the way it was originally designed, as the advertising agencies didn’t want to have more than 53 weeks on one contract. If an order needs to be on one contract, and it’s more than 53 weeks, it will have to be entered into Traffic, and it will be a Traffic only contract. This means that any contract revisions will have to be done in the Traffic module.
How do I enter a $0 Billing Line?
Enter in a billing line as you normally would. In the “Rate$” column enter in a value (this amount will not appear on the contract or the invoice). In the Disc. column, enter in -100. This will give a discount of 100%, making the “DRate$” column $0

Revisions to an Existing Booking
Any sort of changes that are made to a contract, must be rebooked and re-sent to Traffic. This includes, but is not limited to, rate changes, altering the spots per week, deleting a rotation, etc.
Once the changes have been made, follow these steps.
Click on the Save button at the top of the screen
![]()
Click on the Ok button at the bottom of the screen
![]()

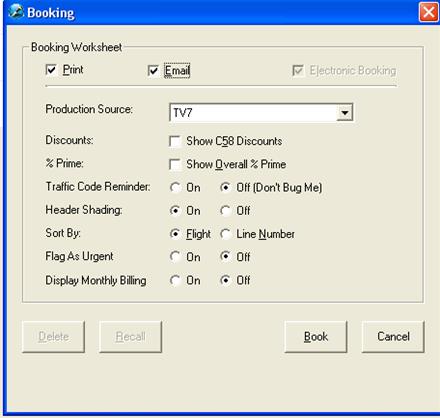
The booking must be re-sent to Traffic in order for the changes to go to air; do this by clicking on the Handshake icon
![]()

Check mark Print and Email (if desired) and click on Book

Once the booking has been sent to Traffic, it will appear in the Rep Outbox in Booking Express with a status of Revised Booking
![]()

When the booking has been confirmed from Traffic, it will then move the Rep Inbox, with a status of Booking Confirmed.

Scenario #1 – Adding Spots to an Existing Flight
![]() Log into
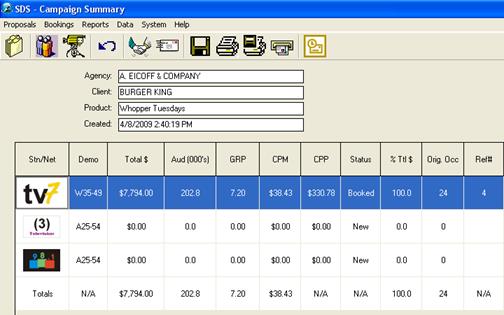
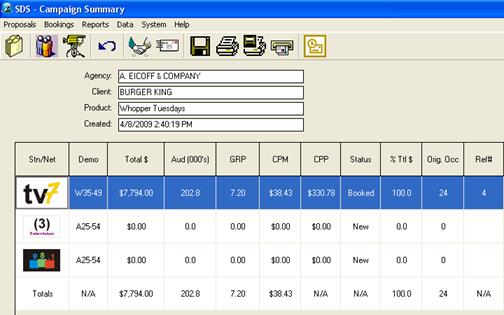
SDS and click on the Proposal File icon. Select Booked from the drop down
and locate existing Booking. Double click on the booking or click on the
Open button.
Log into
SDS and click on the Proposal File icon. Select Booked from the drop down
and locate existing Booking. Double click on the booking or click on the
Open button.
![]()
![]()

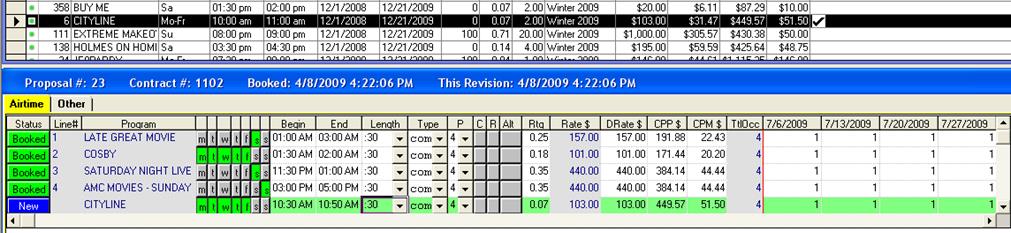
Once it’s loaded on the Campaign Summary page, double click on the station; this will take you into the Schedule Builder
![]()

The following screen will appear – the Program List at the top and the Booking Information at the bottom of the screen

Add a couple of spots to a program in a week that has yet to air. Scroll over to where the date appears – dates appear as the first Monday of the week.
Note - If a spot is only to be added to one week, ensure that Auto-Spot Copy is turned OFF
![]()
![]()
Click on Save and Rebook this by clicking the Handshake button
Scenario #2 – Adding Spots to a Week That Doesn’t Exist on the Booking
Part 1 – Adding a New Flight
Open the existing contract and click on the Schedule Builder icon
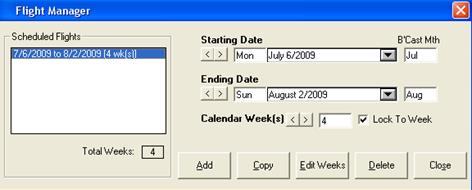
Click on the Flight Manager icon at the top of the screen
![]()

Add a new flight period by clicking on the drop down calendar. Select the start date and end date and click on Add. Click Close.

The new flight period will now be added to the schedule
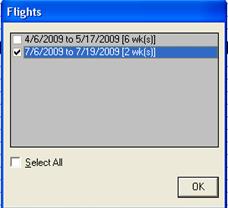
Add a program from the Program List. A Flight dialogue box appears – select the flight date you wish to add the program to. Click the Ok button
*Note – check marking “Select All” will add spots to the program for all flight periods
The program will now be added to the schedule – the status of the line will be New
![]()

Click on Save and Rebook this by clicking the Handshake button
Part 2 – Extending the Existing Flight Period
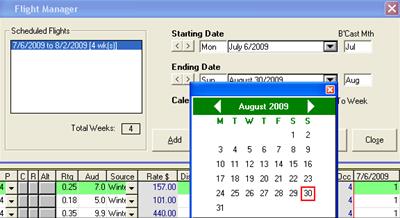
Click on the Flight Manager icon at the top of the screen
![]()

Highlight the existing Flight Period. Click on the End Date and extend it by a few weeks, selecting Sunday as the end date
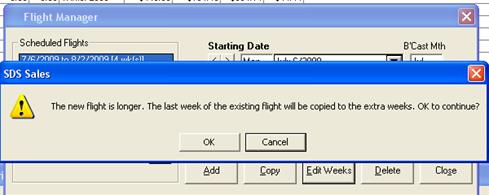
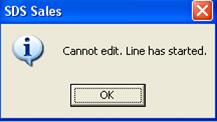
Click on the Edit Weeks button. The following message will appear. Click on Ok to continue. Then click the Close button on the Flight Manager
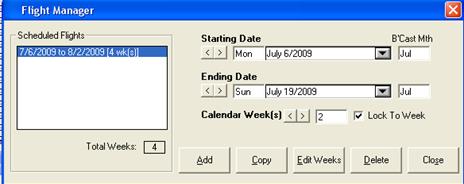
The lines on the booking will appear as Revised; the spots will be added to the new flight period automatically
![]()

Click on Save and Rebook this by clicking the Handshake button
Part 3 – Deleting a Flight Period
Click on the Flight Manager icon at the top of the screen
![]()

Click in the Scheduled Flights box and highlight dates

Click on the drop down of the end date and shorten the flight. Click on Edit Weeks

The following message will appear

Click Ok to truncate the weeks – this will automatically delete the spots from the schedule and all lines on the schedule will change to Revised
Click on Save and Rebook this by clicking the Handshake button
Scenario #4 – Deleting all spots on a line
Open up an existing booking and click on the Schedule Builder icon
Attempt to delete a spot where there is only one spot booked to one week, or delete all spots on a line. The following message will appear

To delete spots for the entire line, the line must be deleted. Right click on the line and select Delete
![]()
The line status will now become “Deleted.” The line will not be deleted until it is accepted through to Symphony

Click on Save and Rebook this by clicking the Handshake button
You will not be able to delete spots in the current week or if the line has started – the following message will appear. In this case, you will have to get the Traffic Department to remove the spots for you.

Scenario #5 – Deleting spots as of a certain date
To delete spots on a line where the line has started, but only future weeks are affected, do the following.
Place your cursor in the week where you want to edit the spots – example below depicts the week of December 17th. Enter in the number of spots that it will be changing to. In this week, it’s been reduced from 5 to 0 spots per week for the rest of the campaign

To add in a different amount of spots for the remaining of the campaign, double click on the program from the programs list, and add in the spots. Ensure that there aren’t any spots in the weeks in the past by placing zeroes in those flights.
Once all has been entered, click Save and click the Handshake button to rebook.
![]()
![]()
![]()

Scenario #6 – Moving spots from one day part to another
Part 1 – adding the spots to an existing day part
Open an existing booking and click on the Schedule Builder icon.
Click on the day part that needs to be edited
Decrease
the number of spots per week – ensure that Auto Spot Copy is off 
Click on the day part where the spot will be added – both lines will have their status changed from Booked to Revised
![]()
![]()

Click on Save and Rebook this by clicking the Handshake button
Part 2 – adding the spots to a new day part
Open an existing booking and click on the Schedule Builder icon.
Add the new day part to the schedule by double clicking the day part name in the Program List
![]()
![]()
![]()

Remove
the spots from the existing day part and move them to the new day part – ensure
that Auto Spot Copy is off 
![]()
![]()
![]()

Click on Save and Rebook this by clicking the Handshake button
How to Time Tighten a Day Part/Rotation
Click on the day part that requires a tightened time. Click in the Begin Time column and type over the existing time
![]()
![]()
![]()

The spots will now air between this defined time period for the defined date range
I was trying to import an Audience table using the Numeris format, but I’m having difficulties. Is there something I’m doing wrong?
There are a few rules that need to be followed when you are building the audience table in Excel:
•The name of the tab at the bottom needs to be Sheet 1
•The name of the program must only be 20 characters
•The market ID must be correct (provided by Numeris)
•You can’t freeze the panes within the sheet, or have inserted comments on the cells
•The name of the spreadsheet must be in an 8 character format. For example AUDSPR12.xls
•If the rating/audience information doesn’t have anything for a demo, you need to enter zeroes
•You must import a population table separately, and must be in SDS’ format (data provided by Numeris)
Once you are ready to save, click on the last entry of the spreadsheet (the last cell of the last demo of the last program) and hit save at that point. Click somewhere else on the page, and use your ‘Ctrl’ and your ‘End’ buttons. This will take you to that last cell, and ensures that there aren’t any empty cells within the sheet.