The security screen provides the System Administrator to add new users to the system and allocate which areas of the SDS Traffic System are accessible to each user.
Adding a New User and Granting Permissions for SDS Traffic
Steps:
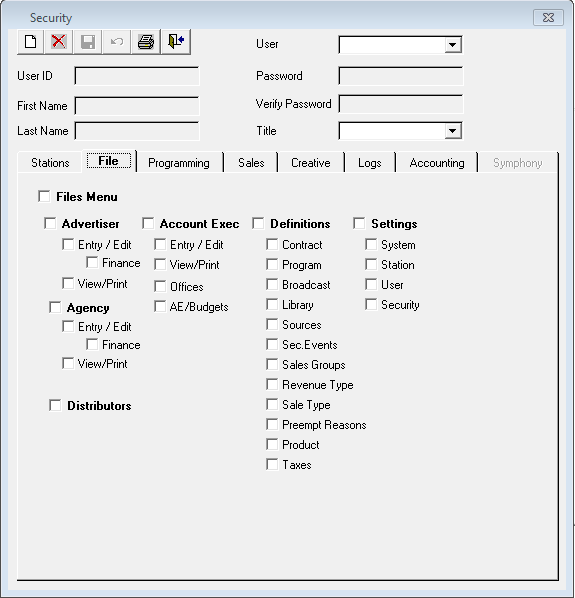
From the File menu, select System Configuration, Security. The following screen will appear:
Click on the New icon
All of the fields as well as menu options will be clear and ready for entry.
Fill in:
User ID and Password – this is what the user will use to log into SDS Traffic and SDS Symphony
First Name – given name of the user
Last Name – surname of the user
Password – the password the user will use each time they log in; this does not have to be alpha-numeric. It is a maximum of 10 characters.
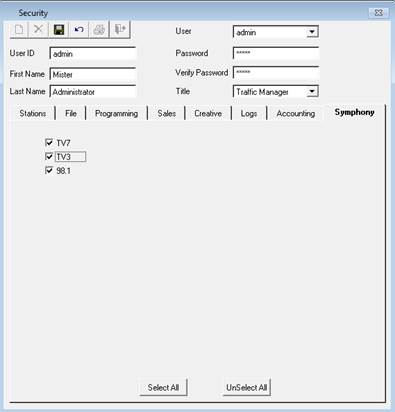
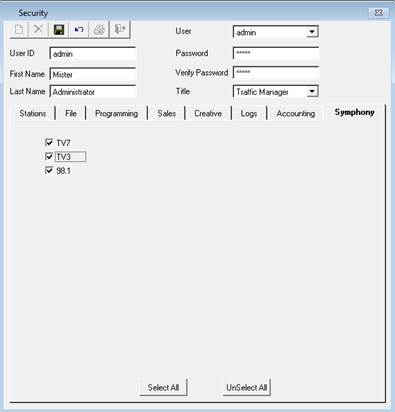
There are eight tabs in Security, one for each menu in the Traffic system and a tab for access to SDS Symphony. Select the menus for which the user will have access to. Note, that only a user set up as a Traffic Manager and Assistant Traffic Manager will have access to the Symphony tab.
To select all of the options in a menu simply click the check box beside the name of the menu. For example if a user will be given access to all of the menu options under the File menu, check the box next to File Menu and this will select all of the options.
The following users have access to everything in SDS. There aren’t any limitations to what this user level can do, unless options are turned off at each level of the security tabs
•Finance Manager
•Traffic Manager
There is one limitation to these user levels, and that is the ability to make changes to contracts after invoicing has taken place
•Assistant Traffic Manager
•Sales Manager
•Other (does not have access to the Symphony tab; it’s greyed out)
Note – the access given to the Symphony tab can be different than the access that the user has in Traffic (for example to help out another user when they are on vacation)
File tab:

As with all of the security options in SDS, each level can be tailored to what the administrator sees fit.
File Menu – this needs to be check marked in order to choose any of the consequent items in the menu of Traffic
Advertiser:
•Entry/Edit – gives ability to enter new advertisers and edit existing ones. Note that advertisers cannot be deleted by users in this screen. This is something that only SDS has the ability to do currently
•Finance – gives the ability to add/modify Credit Limits to the advertiser. Note that when a user does this, their username will appear, along with the date that they entered it
•View/Print – ability to view and print (or export into a PDF or Excel) the advertiser list
Agency:
•Entry/Edit - ability to enter new agencies and edit existing ones. Note that agencies cannot be deleted by users in this screen. This is something that only SDS has the ability to do currently
•Finance – this will give the user the ability to add Credit Limits to the agency. Note that when a user does this, their username will appear, along with the date that that they entered it
•View/Print – ability to view and print (or export into a PDF or Excel) the agency list
Distributors - this is a television function. It is used to enter in the distributor of the television program. For example MGM Worldwide, Fox Studios, etc.
Account Exec:
•Entry/Edit – ability to enter new Account Executives
•View/Print – ability to view and print (or export into a PDF or Excel) the list of AE’s
•Offices – ability to enter in the office locations of each of the AE’s. Then, when entering the AE’s, the office can be linked to them
•AE/Budgets – budgets and targets can be entered against either the AE or against the Office. The budget is their goal, and the target is anything above and beyond what the budget is
Definitions Menu – this needs to be check marked in order to choose any of the consequent items in the menu of Traffic
Contract – function of television. These are the types of programs that the station will air. For example, Infomercials, News, Programs.
Program – function of television. These are the program types/genres that the station will air. For example, Comedy, Drama, Sc-Fi, etc
Broadcast – function of television. These are the broadcast sources, and identifies if the program is a Live event, if it’s in post release (meaning it’s airing after it airs in the U.S from the main network, for example), etc
Library – The original function of this was to label the primary station of where the tapes of the programs were located at the television station. In radio, this area of SDS is to allow for recognition of different voices on a commercial spot. This piece of information appears on the log in Log Edit so that no two commercials with the same ‘voice’ will be played back to back.
Sources – this indicates the creative source. Meaning, where the commercial spot coming from. There are a series of companies that television stations use to ‘download’ the commercials. For example MIJO, Drop Folder, etc
Sec. Events – this indicates if any secondary events are used on the air, such as a V-CHIP appearing on the screen (the V-CHIP is the rating of the program that is about to air). Allows you to schedule and manage items such as the logo or bug that you see on the screen.
Sales Groups – this gives the ability for users to enter in their dayparts and features
Revenue Types – this gives the user the ability to enter in Revenue Types to attach to the contracts for tracking purposes
Sale Type – this gives the ability to enter in certain types of packages that is required for tracking purposes (Christmas Package, Spring Fling, etc)
Pre-empt Reason – when pre-empting a spot from the system, SDS requires a reason to be entered. There are a series of pre-defined options in the system, but additional ones can be added to the system using this feature
Product – gives the ability to enter in the product codes (conflict codes) which are in turn attached to the advertiser/contract/creative
Taxes – gives the ability to enter in the taxes for their country and province/territory/state. Can also apply tax to different line types (commercials, sponsorships, billboards, etc)
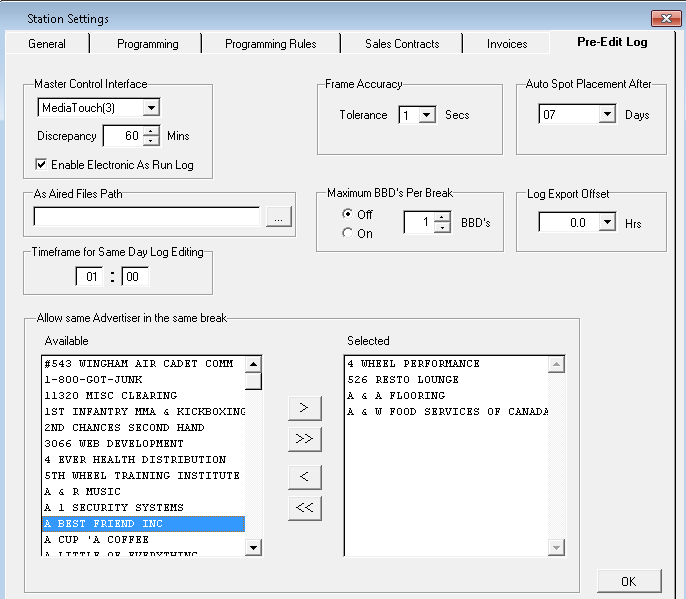
Settings - this needs to be check marked in order to choose any of the consequent items in the menu of Traffic
System – the settings for the entire system. There are various tabs within this screen which will affect all stations, not just the stations the user has access to
Station – the settings for the station that the user has access to, and will only affect the station they have selected from the main Traffic drop down. There are various tabs on this screen from which to choose and make modifications to: General, Programming, Programming Rules, Sales Contracts, Invoices, and Pre-Edit Log
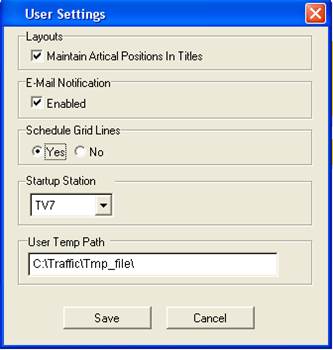
User – this is specific to the user and will only affect the username that is being used to login. For example, there is an option to choose what station Traffic will default to when first logging in
Security – this gives the user the ability to enter in new users, and edit existing user’s security settings
Programming Tab
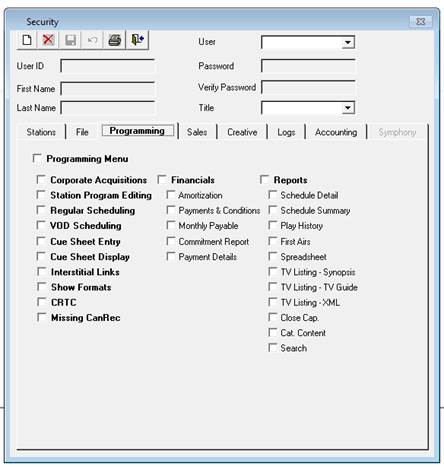
Programming Menu - this needs to be check marked in order to choose any of the consequent items in the menu of Traffic
Corporate Acquisitions – feature for television. This area of the system is used to enter in the programs that the station has acquired, and are available to all stations that are chosen.
Station Program Editing – feature for television. This area of the system is to enter programs for the station that is selected on the main Traffic screen
Regular Scheduling – this area of the system is used to essentially build the framework for the log. The dayparts/programs are ‘scheduled’ on a grid, and formats are applied. This information is what will drive the log so that the commercial spots can be placed
VOD Scheduling – Video on Demand (VOD) is a feature for television and allows for management of the content
Cue Sheet Entry – feature for television. Stations are given the duration of the program and the segments within it. This information is usually received from the distributor of the program.
Cue Sheet Display – displays the programs that have had cue sheet information entered into Cue Sheet Entry, and gives the ability to print out that information
Interstitial Links – this gives the ability to add certain items to the log so that they always appear. For example, if there are promos that always air at the time each day, it can be placed automatically as soon as the log is opened
Show Formats (Clocks) – this allows for Show Format entry in the system (used for both radio and television)
CRTC – feature for television. When entering in programs, it is a requirement of the CRTC to track all log content and submit what they aired at the end of the month. They must adhere to a series of rules according to their conditions of license, which are issued by the CRTC
Missing CanRec – feature of television and the CRTC Canadian programming requirements
Financials - this needs to be check marked in order to choose any of the consequent items in the menu of Traffic
All of these items are generally limited to television, but can be used to track acquired programs such as “American Top 40”
•Amortization
•Payments & Conditions
•Monthly Payables
•Commitment Report
•Payment Details
Reports - this needs to be check marked in order to choose any of the consequent items in the menu of Traffic
Schedule Detail – feature for television, but one that is beneficial in radio is to see what format was applied. This goes back to the very first air date of the station.
Schedule Summary – feature for television, but gives the ability to see what was scheduled in the Regular Scheduling area of the system (what will go to air)
Play History – feature for television. This is a report that keeps track of the amount of episodes of a program that are allowed, that have aired, and how many are left to air
First Airs – feature for television. This is a report that shows the program and its episodes, and where those episodes first aired
Spreadsheet (Play History Spreadsheet) – feature for television. This is a report that will depict what ran for a particular date. Similar to a Play History Report, except that it is created as an Excel spreadsheet
TV Listing – Synopsis – feature for television. This will give a list of the programs and the general synopsis (description) of the program.
TV Listing – TV Guide – feature for television. This will give a list of the programs and the synopsis of each episode that has been scheduled for a particular week. The file that is created is then sent to TV Guide
TV Listing – XML – feature for television. Similar to the other TV Listings, except the file is created automatically as a XML file, which can be uploaded to the television station’s website
Close Cap. – feature for television and is the “Closed Captioning Report.” This will report on any programs that have closed captioning spots included
Cat. Content – feature for television, and is a way for the T.V stations to keep track of how much content has aired (by hours and monthly percentage) based on the category codes set by the CRTC
Search – feature for television. It is a search engine that looks for a program based on various filters
Sales Tab
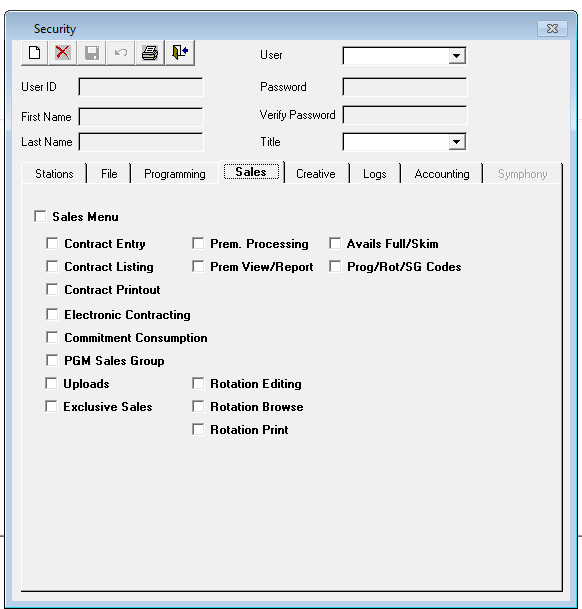
Sales Menu - this needs to be check marked in order to choose any of the consequent items in the menu of Traffic
Contract Entry – this allows the user to enter sales contracts into SDS
Contract Listing – this feature is no longer available in Traffic. It has been moved to the Reports module
Contract Printout – this allows for printing individual or multiple contracts without having to go the Contract Entry screen and create one PDF
Electronic Contracting – this is a television function currently and gives the ability to import contracts from an agency without having to re-key the order. This feature is not available at this time.
Commitment Consumption – not an available feature, but is used with commitment contracts
PGM Sales Groups – this is for television
Uploads – this gives the ability to send a sales group or rotation to the Sales system, so that the AE’s have the ability to sell to it
Exclusive Sales – this is mostly for television. This gives the ability to have a particular advertiser sponsor a program and be the only advertiser with a specific product allowed to air in that program. However, this can also be used with radio when building sports formats
Prem. Processing – this stands for Pre-emption Processing. This area of the system allows for spots to be made good (due to missed creative) or credited, or debited (charge the client)
Prem View/Report – give the ability to generate a printout of all of the spots that have been pre-empted, but not yet made good
Rotation Editing – gives the ability to enter and/or edit rotations
Rotation Browse – allows users to look at all of the rotations in one screen and make changes to the title and the start/end date, instead of recalling each one in the Rotation Editing screen.
Rotation Print – allows the user to print out a list of all of the rotations for that station
Avails Full/Skim – a report that shows how many spots are available for a certain period in time
Prog/Rot/SG Codes – Program/Rotation/Sales Group Codes – this will allow the user to print out a list of all of these items
Creative Tab
Creative Menu - this needs to be check marked in order to choose any of the consequent items in the menu of Traffic
Add/Edit – the entry creative (copy) into the system
Creative Assign (Creative Assignment) – once the copy has been entered into the system, it needs to be assigned to the contracts. This options gives the ability to do so
Global Change –ability to globally change one piece of copy to another in one fell swoop. It’s a ‘search and replace’ function.
Archive/Delete – allows the user to archive creative so that it disappears from the Add/Edit Creative recall list
Retrieve – allows the user to retrieve the archived creative to make it active again (will re-appear in the Add/Edit Creative recall list)
Missing Creative – creates a report that displays what creative is missing on contracts for a defined period
Creative History – will give a history of where the spot has aired for a defined period
Browse Creative –ability to view all creative in the system on one screen (based on the user’s station security). Creative can also be edited via this screen if option is turned on (in station settings)
Dub List – feature for television. This will produce a file listing the available creative that can then be exported to the station’s automation system so that they can import it
Logs Tab
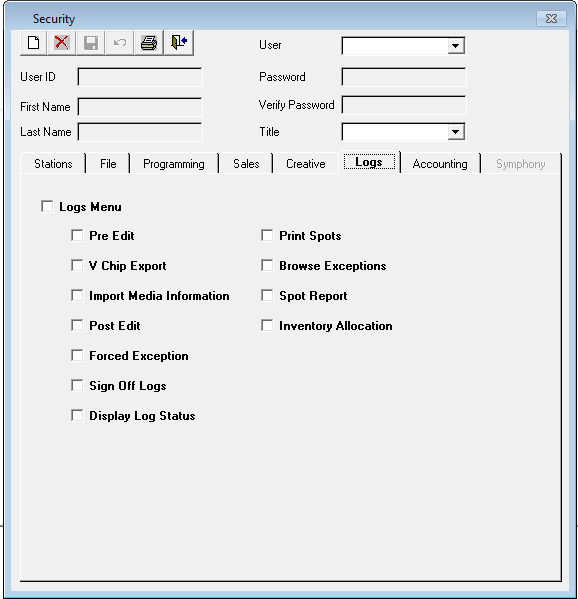
Logs Menu - this needs to be check marked in order to choose any of the consequent items in the menu of Traffic
Pre Edit – this is where all of the log editing takes place
V Chip Export – this is for television only and refers to the rating that appears on the screen
Import Media Information – feature for television
Post Edit – this is to complete the log reconciliation for the previous day’s spots that went to air
Forced Exception Placement – this allows the user to enter in the date and times for spots, instead of manually entering them on the post edit log. This was initially designed for television and secondary events that aired (for example Lottery Crawls).
Sign Off Logs – this gives the ability to sign off an entire months worth of logs, instead of going through the Post Edit area of the system
Display Log Status – this displays the status of the logs for specific month/dates. Will show whether it’s been un-opened, opened, exported, posted, signed off, or invoiced
Print Spots – allows the user to print spots for specific days in the future (will show advertiser, spot times, contract number, rate, etc)
Browse Exceptions – this will generate a report to show all the spots that are currently sitting in exception. Meaning spots that did not make it to the log, or have not yet been placed on the log
Spot Report – this will generate a report for all spots for a particular advertiser or contract for a certain time period. There are many options to choose from this report (name of creative, rate, line comments, etc)
Inventory Allocation – this will generate a report to show how many minutes or seconds were allocated to certain spot types (COM, SPO, etc)
Accounting Tab

Accounting Menu - this needs to be check marked in order to choose any of the consequent items in the menu of Traffic
Generate Invoices – this gives the ability to generate the invoices in the system for the stations that they have access to
Invoice Register – this report is generally run at the end of the month to ensure that all contracts were invoiced. It will show the dollar amount of credits/debits/make goods, taxes, Agency Commission (if applicable), etc
Create E/I Files (Electronic Invoicing) – this will generate a file that contains the agency’s invoices (that have been designated as electronically invoiced) based on the company that they subscribe to. This file is then sent to the various clearing house for uploading
Invoice Printing – gives the ability to print the invoices, as well as save them as a PDF and email them
Export to Accounting – give the ability to export the invoices to a 3rd party provider of accounting software (QuickBooks, etc)
Ledgers (and all menu items listed below) – definitions to set up (GL codes, etc) for the 3rd party accounting software
Symphony Tab – this gives the user access to Symphony to process the orders from Sales into Traffic. The user will only have access to this tab if they are set up as a Traffic Manager, Assistant Traffic Manager, or Sales Manager.
To undo changes, click on the Undo icon. This will undo everything, not just the last action made

Once all of the information has been entered click on the Save icon

To enter multiple users, click on the New icon after each entry and repeat the above steps.
When all users have been entered, click the Exit icon to exit the screen
Modifying a User’s Permissions
Steps:
From the File, System Configuration menu select the Security module. Select the user for whom the permissions will be modified from the User dropdown list.

The selected user’s information will appear. Permissions can then be assigned by selecting (or deselecting) menus and menu options; check-mark the items that the user should not be allowed to see.
The Symphony tab will be available if the user selected from the drop down is designated as a Traffic Manager or Assistant Traffic Manager.
Once all of the information has been entered click on the Save icon

When finished modifying permissions, click on the Exit icon to exit the Security screen
