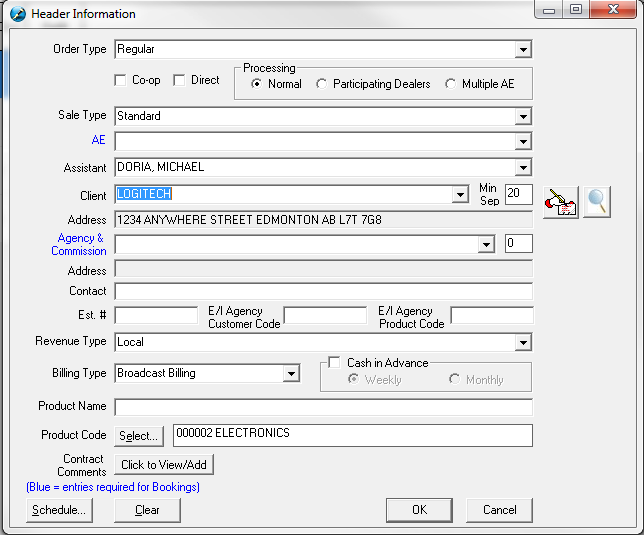
Click on the Header Information button from the Campaign Summary window.
Fill out the appropriate fields; the required fields are displayed in blue.
Order Type – Choose from the drop down list the type of order this will be. The options are system set and cannot be defined by the user. They are as follows:
•Regular – choose this when building a regular order
•Per Inquiry or P.I – A form of marketing in which the advertiser receives free ad time and space while paying only for results. The advertiser gives up control of where and when the ads will run
•Header - Type of In House contract. The only difference is that the print option is bypassed when saving the contract. The contract can still be printed using the Sales Contract Printing area of SDS
•Open Contra – select this when building a Trade/Contra order. By choosing this as the order type, it will denote on the invoice for the client to not remit a payment
•Commitment – Used when the advertiser agrees to spend a certain amount of money. The first line of the contract must be type “UNS” (Uninstructed). The system then subtracts each line after the “UNS.” The contract will keep track of
the amount remaining. Note that this is a Traffic only function, and cannot be set up in SDS Sales.
•Suppressed - Selecting this order type will conceal the rate per spot on each line of the contract, and only the grand total of the contract will appear
•Direct Response - Direct Response and Per Inquiry are similar. The difference is that the advertiser knows where the spot will run, so that the call centre can be ready to respond
•In House – A way to track in house (station) contracts such as a promotion or a public service announcement
Co Op Contract - multiple advertisers will have separate invoices
Direct – check mark this if there isn’t an agency involved
Normal - this is the default and simply means that it is not a part dealer or a multiple AE contract
Participating Dealer – each advertiser pays a certain percentage of the campaign and receives an invoice
Multiple AE – the contract can have multiple reps. When this option is selected, the revenue will be distributed evenly, and the commission will be shared
Sale Type - this gives the ability to add in additional information for tracking purposes (Christmas Package, Spring Fling, etc)
Account Exec – choose the Account Executive (Sales Rep) from the drop down. This is user defined through the main Traffic screen
Advertiser –choose who the client is from the drop down. If the advertiser is direct, then the address of the advertiser will appear in the field below. If the advertiser is being billed to an agency, this field should be empty
Min Sep (Minute Separation) – this indicates the advertiser separation level for this contract between the spots on this contract (minimum is 5 minutes, maximum is 240 minutes)
Agency – choose the agency from the drop down. The address of the agency will appear in the field below
Commission (%) Agency - the agency commission will default based on the agency selected from the pick list, however this value can be changed by entering in the desired value (no decimals);
Contact – this field is optional. Enter in the name of the person you are dealing with at the advertiser or agency
Est # (Estimate number for agencies)/P.O # (Production Order number) – This field is optional. It is a maximum of 10 characters due to standardized rules for Electronic Invoicing.
E/I Client Code – this is an 8 character field, and this information is provided by the agency for Electronic Invoicing purposes (fields will only appear if an agency has been selected). If the agency is not using DDS, the field can be 8 characters long
If the agency is using DDS for Electronic Invoicing, the following rules must be adhered to:
•The estimate field should contain a number between 1 and 250
•The agency client code should contain a 2 or 3 character alpha-numeric code. The first two characters must be alpha or a number from 1 to 5, the third may be alpha or a number from 0 to 9, or it may be blank
E/I Product Code - this is an 8 character field, and this information is provided by the agency for Electronic Invoicing purposes (fields will only appear if an agency has been selected). If the agency is not using DDS, the field can be 8 characters long
If the agency is using DDS for Electronic Invoicing, the following rules must be adhered to:
•The agency product code should contain a 2 or 3 character alpha-numeric code where the first character must be alpha, the second and third characters can be alpha or a number from 0 to 9, or the third character can be blank. DDS agencies cannot use NO, ZZZ, ALL, YES, UNA, or AAA as valid products
Revenue Type – this is user defined and will track the different types of revenue that is in the system
Billing Type – choose from Broadcast or Calendar billing
Cash in Advance – choose from None, Weekly, or Monthly. A few notes on this feature
•If the contract is a participating dealer, the cash in advance feature is not available
•If you are not using SDS AR, the cash in advance feature is not available
•There are 3 settings to choose from (found in the System Settings)
o Do Nothing – the log can be exported without any warnings
o Warn User before exporting the log – “The following contracts are cash in advance, but payment has not been received. Do you wish you export the log?”
o Warn and prevent the log from exporting – “The following contracts are cash in advance, but payment has not been received. The log cannot be exported until the spots are removed from the log, or the payment has been received”
Product Name – this is the name of the campaign – not a mandatory field. This will appear on contracts and invoices.
Contract Comments – This will show rejection reasons that were made by the Finance, Sales, or Traffic Manager. It will also show any comments that Traffic has entered onto the contract. These are internal comments, and do not print out anywhere
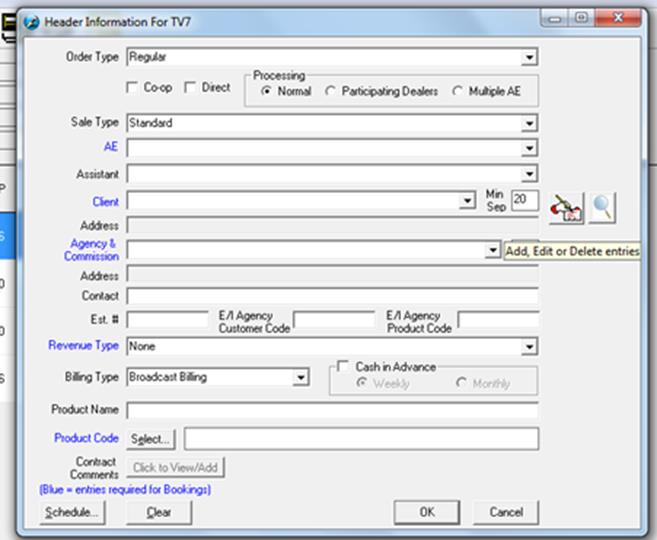
You will notice for certain fields such as Agency and Client, each time these fields are selected a button on the right side will follow. The Add, Edit or Delete button allows you to manage the Agency or Client. When adding new clients or agencies, ensure that it does not exist in the system already, as sometimes there may be variations to the way the name is spelled or abbreviated. It is important not to have duplicate entries, as Management Reports will become inaccurate.
Once the Header Information fields have been filled, click OK to go back to the Campaign Summary. Next, click on the Schedule (the Camera icon) button to go directly into the selected Station.
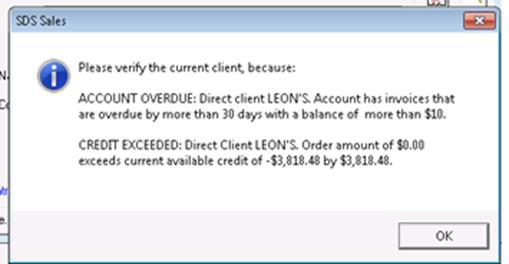
If when choosing an advertiser that has exceeded their credit limit (when this feature has been activated in System Wide Settings), immediately there is a message to the user indicating that this chosen advertiser has exceeded their credit limit.
To continue building the proposal, click the OK button
To add a new Advertiser into the system, follow these steps:
In the Header, click on the Advertiser drop down so that the entry button appears. Click on the button.
![]()
*Please note that if the advertiser is attached to an Agency, you do not have to enter in any address information.
Click on Add at the top of the screen. Enter in all required information:
Order Type – these are system defined
Client name – enter in the name of the advertiser
Product Code – click on the select button and choose from the list
Billing – choose whether it is Broadcast or Calendar billing
Country & Territory – this must be chosen in order for the taxes to be charged for the client (if applicable)
Separation – determine what the time separation will be for this particular advertiser. The default will be derived from Traffic.
Contact Mailing – enter in the appropriate information. If the invoice is going to a different person other than where the contract is going, enter that information under Invoice Mailing. If it is the same, leave it as is.
Note that the email address has a maximum character limit of 256 (as per internet protocol)
*Please note that if you are a SDS Symphony client, you will not be able to change the address information for the client once entered and have it reflected in SDS Traffic. You will have to have your Traffic Manager update the information for you.

Once you click the Ok button, the system will go out and search for advertisers that have similar names. If you see that the advertiser really does exist, this is your opportunity to simply choose it and click Ok.
If it doesn’t exist, click on the Cancel button to add this new advertiser to the system. The advertiser entry screen will appear again – hit the Cancel button.
Once the Header screen re-appears, choose the new advertiser from the drop down list